Battery switch on travel trailer function is crucial for managing your RV’s power. Understanding how this simple switch works can prevent costly battery drain, protect sensitive electronics, and ensure a smooth camping experience. This guide breaks down the different types of battery switches, their functions, how to use them safely, and how to troubleshoot common problems. We’ll also cover integration with solar panels and inverters.
From single-pole to double-pole double-throw switches, each type offers unique advantages and disadvantages. We’ll delve into the specifics of connecting and disconnecting your batteries, highlighting essential safety precautions. Troubleshooting tips will help you diagnose and fix common issues, ensuring your RV’s electrical system runs smoothly. We’ll even explore the interplay between your battery switch, solar panels, and your inverter for a comprehensive understanding of your RV’s power management.
Function and Purpose of the Battery Switch
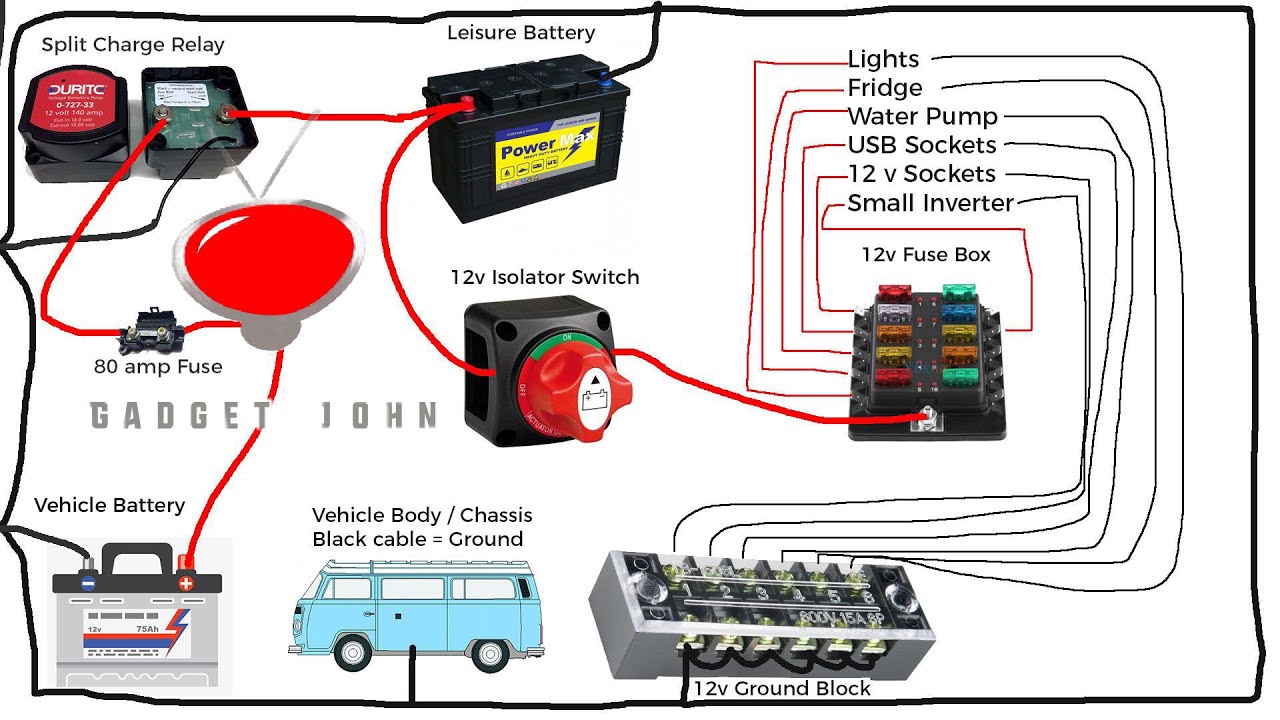
The battery switch in your travel trailer is a crucial component of its electrical system, acting as the main on/off control for your house batteries. It’s a simple but vital device that manages power flow and protects your investment. Understanding its function is key to preventing problems and ensuring reliable power for your RV adventures.This switch allows you to completely disconnect your house batteries from the rest of the trailer’s electrical system.
This is particularly important for preventing parasitic drain – the slow but steady depletion of battery power caused by small electrical draws even when the trailer is not in use. By switching the batteries off, you’re essentially cutting off power to all devices connected to the house battery system, preserving your battery charge for when you need it most.
So, you’re planning a trip? Awesome! First things first: get yourself sorted with travel insurance. Check out Aon travel insurance for solid coverage. Then, think about your in-flight entertainment. If you’re an audiophile, a great audiophile travel setup is a must-have for those long flights; it’ll make the journey way more enjoyable.
Don’t forget to pack your headphones!
Battery Switch and Power Management
The battery switch acts as a gatekeeper for power flow between the house batteries and the trailer’s electrical system, including appliances, lights, and other 12-volt devices. In the “on” position, power from the house batteries is available to these systems. When the switch is in the “off” position, the flow of power is completely interrupted, effectively isolating the batteries. This isolation is critical for safety and preventing accidental discharge.
Many switches also offer a third position, often labeled “both” or “combine,” which allows the charging system (either shore power or alternator) to charge both the vehicle and house batteries simultaneously. This ensures both battery banks are adequately charged when the trailer is connected to shore power or while driving.
Battery Switch and Parasitic Drain Prevention
Parasitic drain is a common problem in RVs. Even when everything appears to be turned off, small electrical draws from devices like clocks, smoke detectors, and control panels can slowly drain your batteries over time. A properly used battery switch effectively eliminates this issue. By turning the switch to the “off” position when the trailer is not in use for extended periods, you prevent these small draws from depleting your battery power.
This is particularly important during storage or when you’re away from your trailer for a considerable time, ensuring your batteries are ready when you return. Leaving the switch on can lead to a dead battery, requiring a jump start or potentially causing damage to sensitive electronics.
So, you’re planning a trip? Awesome! First things first: get yourself sorted with travel insurance. Check out Aon travel insurance for some solid options; they’ve got you covered. Then, if you’re an audiophile like me, you’ll want to think about your travel setup. A good portable DAC is essential, and you can find some great tips and gear recommendations on audiophile travel aetup websites.
Make sure you’ve got both bases covered before you jet off!
Battery Switch and Protection of Sensitive Electronics
While preventing battery drain is a primary function, the battery switch also plays a role in protecting sensitive electronics. By isolating the batteries, the switch prevents voltage spikes or surges from reaching these components. These surges can be caused by various factors, including problems within the charging system or even lightning strikes. By acting as a barrier, the switch helps to safeguard delicate electronics and prevent costly repairs.
A fully charged battery provides a stable voltage, but the switch adds an extra layer of protection against unexpected electrical events.
Battery Switch Maintenance
Keeping your travel trailer’s battery switch in good working order is crucial for reliable power. Regular maintenance prevents costly repairs and ensures you’re always ready for your next adventure. Neglecting this simple task can lead to corrosion, poor connections, and ultimately, a dead battery when you need it most.Proper maintenance involves a routine schedule of cleaning, inspection, and tightening of the battery switch and its related components.
This ensures a consistent flow of power to your trailer’s systems. Remember, safety is paramount when working with batteries, so always disconnect the negative terminal first before performing any maintenance.
Battery Switch and Terminal Cleaning Schedule, Battery switch on travel trailer function
A good rule of thumb is to inspect your battery switch and terminals at least every three months, or more frequently if you live in a humid climate or experience heavy use. This inspection should include a visual check for corrosion, loose connections, and any signs of damage. More frequent inspections might be necessary if you notice any unusual smells or performance issues.
Cleaning and Tightening Battery Terminals
Corrosion is the enemy of good electrical connections. It forms a resistive layer that impedes the flow of electricity, leading to poor performance and potentially even damage to your batteries. To clean the terminals, you’ll need a wire brush, baking soda, and water. First, disconnect the negative terminal (usually marked with a “-” sign). Then, use the wire brush to thoroughly clean the terminal posts and clamps, removing any corrosion.
Mix a paste of baking soda and water and apply it to the terminals, letting it sit for a few minutes to help neutralize any acid buildup. Scrub again with the wire brush, then rinse with clean water. Once everything is dry, reconnect the negative terminal securely, ensuring a tight connection. Repeat this process for the positive terminal.
Use a wrench to ensure the terminal clamps are tightly secured. Don’t over-tighten, as this could damage the terminals. A good, firm connection is all that’s needed. After cleaning and tightening, inspect the connections again to ensure a good, clean, and tight fit. If corrosion continues to be a problem, consider using a corrosion inhibitor product designed for battery terminals.
Battery Switch and Inverter Interaction: Battery Switch On Travel Trailer Function

Your battery switch and inverter work together to power your AC appliances in your travel trailer. Understanding their relationship is key to avoiding problems and ensuring you have power when you need it. The battery switch acts as a gatekeeper, controlling the flow of power from your batteries to the rest of your electrical system, including the inverter.The inverter converts the DC power from your batteries into AC power, which is what most household appliances require.
The position of your battery switch directly affects whether the inverter can access the necessary DC power. If the switch is off or in the wrong position, the inverter won’t receive power, and your AC appliances won’t work, regardless of how much charge is in your batteries.
Inverter Operation Based on Battery Switch Position
The battery switch typically has several positions: “Off,” “Battery 1,” “Battery 2,” and “Both.” The “Off” position completely cuts power to the system. “Battery 1” and “Battery 2” allow power from only one battery bank to be used. “Both” allows power from both battery banks to be used. When using an inverter, the switch must be in a position that allows the inverter to draw power.
If only one battery bank is used, the switch needs to be set to “Battery 1” or “Battery 2” accordingly. If both battery banks are to be used, it needs to be in the “Both” position. Choosing the wrong position will prevent the inverter from functioning correctly.
Examples of Battery Switch Position Impact on Inverter Function
Imagine you’re trying to run your microwave (an AC appliance) using your inverter. If your battery switch is in the “Off” position, the inverter won’t receive any power from the batteries, and the microwave won’t work. Similarly, if you have two battery banks and your switch is set to “Battery 1” but your inverter is wired to “Battery 2,” your microwave will also fail to operate.
To run your microwave successfully, you must ensure the battery switch is in the correct position to supply power to the inverter. This could be “Battery 1,” “Battery 2,” or “Both,” depending on how your system is wired. Another example: If you’re using a larger AC appliance like an air conditioner and your battery switch is only in the “Battery 1” position, you might not have enough power from that single bank to support the inverter’s demand, leading to insufficient power or even damage to the inverter.
Using the “Both” position would provide sufficient power in this scenario.
Mastering your travel trailer’s battery switch is key to maximizing your RV’s power and extending the life of your batteries. By understanding the different types of switches, their functions, and proper maintenance, you can confidently manage your RV’s electrical system and prevent potential problems. Remember to always prioritize safety when working with batteries and electrical components. With a little knowledge and preventative care, you can enjoy worry-free power on all your adventures!
Essential FAQs
What happens if I leave my battery switch on all the time?
Leaving your battery switch on constantly can drain your house batteries, especially if you have parasitic draws (devices consuming power even when turned off). It’s best to turn it off when not using the RV for extended periods.
How often should I clean my battery terminals?
Inspect and clean your battery terminals at least every three months or more frequently in humid climates. Corrosion can significantly impact battery performance.
Can I use a different type of battery switch than what came with my RV?
It’s generally recommended to use a battery switch with the same amperage rating as your original switch. Consult an RV electrician if unsure about compatibility.
My battery switch is making a clicking sound. What’s wrong?
A clicking sound often indicates a faulty switch or a problem with the battery connections. Check for loose wires, corrosion, and blown fuses before replacing the switch.
